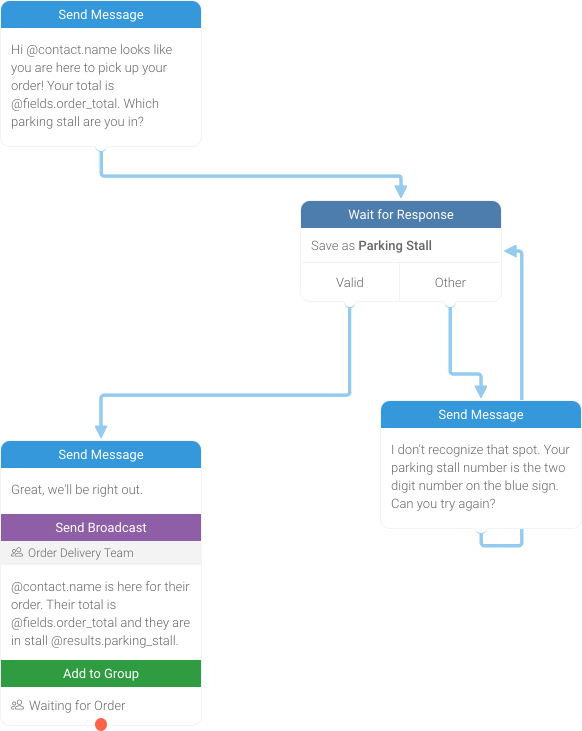
***Our Zapier application is now Global! Learn how to store & retrieve data outside of TextIt here***
Quickly and easily configure your flows to communicate with a Google Sheets 'database' without writing a single line of code. Google Sheets are handy for storing data outside of TextIt that can then be distributed to any of your contacts.
A few weeks ago, we announced a private TextIt Zapier app to gauge interest in a first-class integration. Since then, we’ve found Zapier to be an invaluable tool to users with use cases that require external services, e.g.:
- Distributing and verifying coupons and vouchers.
- Adding contacts who complete a web form to a flow.
- Adding Salesforce contacts to flows.
- Use HookPress to trigger flows from actions taken on your Wordpress site.
The high-level, low-requirement functionality Zapier provides falls in line with the purpose of TextIt: enable anyone, regardless of technical know-how, to build highly performant messaging applications and chatbots.
A first-class TextIt Zapier app is on its way. In the mean time, you can follow this link while signed-in to your Zapier account to gain unlimited access. Worried about managing the costs of both services? Don’t sweat it. The great thing about private Zapier apps is that you can use them to build multi-step Zaps on a free plan (a restriction if using only global apps).
This article highlights the integration we’ve observed to be the most useful: TextIt <> Google Sheets. Why Google Sheets? It enables you to create one or more external databases and connect them to TextIt in minutes. First, a primer on data storage within TextIt.
Data Storage within TextIt
There are two ways to store and distribute data via your TextIt account. The first is via flows. Inside a flow, you can use RuleSets to collect data from your contacts which is then stored as a flow field with a corresponding flow variable, initiated by the '@flow.' variable prefix. You can then distribute data via Send Message actions. The second is via Contact Fields, which allow you to store data as attributes on each contact, though no contact can reference another (unless they're started in a flow when another contact reaches a Start Someone Else in a Flow action in a separate flow, in which case they can reference the previous run's fields (using the '@extra.flow.' variable prefix) or the contact (using the '@extra.contact.' variable prefix).
Data Storage Outside of TextIt
While flows are useful for collecting and distributing data stored within your account, they can also be used to communicate with external services, like Zapier, allowing you to automatically store and edit data outside of TextIt so it can be accessed by all of your contacts. Storing data outside of TextIt is useful in a variety of contexts, particularly:
- Storing, distributing and verifying coupons and vouchers.
- Storing flow fields outside of TextIt instead of creating new contact fields.
- Managing signups for an event, service or job.
A. Barr Simpson
What better way to demonstrate this configuration than an example? A. Barr Simpson, a distributor and manufacturer of fountain soda products, uses TextIt's Zapier app to manage its padlock spreadsheet. A. Barr Simpson delivers certain products with a lockbox. In order for customers to receive the product's code, they must interact A. Barr Simpson's TextIt application.
Account Verification
Customers send the keyword 'code' to interact with the flow that distributes padlock codes:
The flow (1) asks for the active contact's account number, (2) uses 'Split by Expression' RuleSets to convert the contact's name, phone number (in E.164 format) and the date and time at which the contact requested the code to flow fields and (3) posts this information to the URL that our 'Webhook Action' trigger provides (click here for a comprehensive guide to our 'Webhook Action' trigger).
The intended destination for this information is A. Barr Simpson's padlock spreadsheet. Here's a simplified example:
This spreadsheet will eventually contain the information of the customer who last looked-up the code and the driver who last updated the padlock's code. I entered the account number '1010101', so the row containing this number will be updated.
This is where things get tricky. If you intend to lookup a row and update it, you first need to add an 'Update Spreadsheet Row' action to your Zap:
Once the spreadsheet and worksheet have been chosen, I click the 'Add a Search Step' button. This will add the lookup action that allows Google Sheets to find the row it will eventually update:
In the 'Lookup Spreadsheet Row' action, I'll need to add the column you'd like Google Sheets to lookup and the value (provided by the first step in your Zap, the TextIt 'Webhook Action' trigger) I'd like it to match. In this case, I'm looking up the 'Account Number' column in the Google Sheet and matching it with the 'Account Number Rule Value' value ('Account Number' being the name of the flow field created by the RuleSet that collects the contact's account number, and 'Rule Value' being the value that's created after the contact's response passes through its 'has a number'
response rule):
Once this step is completed, I arrive at the 'Update Spreadsheet Row' action I started earlier. You'll notice that the 'Row ID' field now contains 'Use a Custom Value' (the value taken from the TextIt 'Webhook Action' trigger: the contact's account number). I enter the TextIt 'Webhook Action' trigger values I'd like each column to contain, then complete the step:
Zapier will then update the spreadsheet with the sample data I've selected. From here on out, these will be the data updated to my spreadsheet when a contact completes the associated flow.
Code Distribution
Next, I add a 'Start Contact in Flow' TextIt action to my Zap that starts a flow that distribute's the padlock's code. Here's an example of how that flow might look:
Notice the '@extra' variables. These will be used to reference values in my spreadsheet. When the contact starts the flow, they'll be replaced with the values I choose. I've also added Send a Message to Someone Else and Send Email actions to notify me when a customer has accessed their padlock code.
There are three ways to start a contact in a flow via the TextIt 'Start Contact in Flow' Zapier action:
- Specifying their group(s).
- Specifying their UUID(s).
- Specifying their phone number(s).
Note: To pass a contact's UUID to Zapier, simply create a 'Split by Expression' RuleSet that converts the variable '@contact.uuid' to a flow field:
The contact's phone number will work just fine for this example. Note that the 'Restart Participants' field must always have the value 'Yes'. This ensures contacts who've already completed this flow will be able to enter it again.
Finally, I'll add the extra fields that will correspond with the '@extra' variables in my flow: @extra.account, @extra.code, @extra.name and @extra.date:
Note that field names entered in this step are case-sensitive; always use lowercase letters.
That's it! Turn on your Zap, organize it with a folder, and sit back as TextIt and Zapier automate the rest!
Questions? Comments? Let us know; we love hearing from you.
Follow us on Twitter to interact with a chat bot built with TextIt, or create a free account to build your own. You'll be sending messages in minutes! Get in touch anytime with any questions, comments, or suggestions.